Chapter 2. Getting Started with Access Server
Access Server can be controlled in three ways:
by using the WWW interface
by entering commands and using applications at the Access Server shell prompt
by sending and/or retrieving files to/from Access Server.
Note: The default username is root and the default password is buffy.
2.1. Powering Up
To get started with Access Server, connect it to your local area network (LAN) by using an Ethernet cable, and connect the power adapter. Access Server will power up and retrieve the network settings from your network's DHCP server.
Access Server will also use Zeroconf (also known as Zero Configuration Networking or Automatic Private IP Addressing) to get an unique IP address in the 169.254.x.x network. Most operating systems also support this. In other words, you can connect your controlling laptop with a cross-over Ethernet cable to Access Server, then power up Access Server, and the devices will automatically have unique IP addresses in the 169.254.x.x network.
Note: If you need to configure the network settings manually and cannot connect first by using Zeroconf, you can do it by using the management console. For more information, see Section 2.3.1.
The physical interface locations of Access Server are described in Figure 2-1 and Figure 2-2.
Note: There is no power switch in Access Server. The adapter is the disconnection device; the socket-outlet shall be installed near the equipment and shall be easily accessible. Unplug and plug the power adapter to switch the power on and off. The power led in Figure 2-2 is on when the power adapter is connected.
All the blue status LEDs are turned off when the boot procedure is finished and Access Server is ready to be connected.
2.2. WWW Interface
Most Access Server functionality can be controlled through the WWW interface by using any standard WWW browser.
The wrapfinder application (see Figure 2-3), available for the Windows operating system from Bluegiga Techforum (https://www.bluegiga.com/techforum/) provides an easy-to-use interface for finding Access Servers (with SW version 2.1.0 or later) in the local area network.
When wrapfinder is launched, it automatically identifies the broadcast address of the network it runs in and sends a special query packet (UDP broadcast) to Access Servers. Most important information in their answers is then shown in table format.
You can change the broadcast address used for finding Access Servers. A new scan can be done by clicking Rescan.
Select an Access Server by clicking its serial number, and click Details to see more information (such as all Bluetooth addresses and friendly names) on Access Server. See Figure 2-4 for details.
Click Connect or double-click a serial number to connect to the selected Access Server by using a WWW browser.
Click Exit to close the program.
Note: To find Access Server's IP address without wrapfinder, see Section 2.3.2.
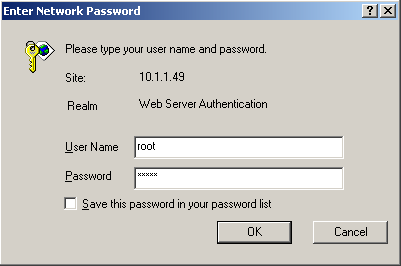
To access the WWW interface, enter the IP address of Access Server to the browser's address field and press Enter (see Figure 2-5).
From the top-level page, click Setup to log in to the configuration interface. The default username is root and the default password is buffy (see Figure 2-6).
After logging in, you can configure several Access Server settings (see Figure 2-7). These are discussed in detail in Section 2.4.
2.3. Shell Prompt Access
Shell prompt access may be needed for advanced controlling operations that cannot be performed by using the WWW interface.
You can get to the shell prompt by using either SSH or the management console. The management console is only needed to change the network configuration settings if you cannot configure the network by using DHCP or Zeroconf. The management console is connected to Access Server with a serial cable. All further controlling activities can be performed remotely using SSH sessions over Ethernet or Bluetooth LAN/PAN connection.
If you can establish an SSH connection from a device that has Bluetooth LAN Access or PAN profile support, you do not need the management console. Just connect to Access Server by using LAN Access or PAN profile. Access Server can be seen in Bluetooth inquiries as "Wserialno_n", where "serialno" is the serial number of the device and "n" is the number of the Bluetooth baseband in question (model 2293 has three Bluetooth basebands, any of which can be connected). After you have connected to the server (no PIN code, username or password needed), establish an SSH connection to the device at the other end of the connection, typically 192.168.160.1. You can also use the wrapfinder application to find the IP address (see Section 2.2 for details).
Note: Bluetooth LAN Access and PAN profiles are disabled by default. Use the WWW interface to enable them, if needed. The PAN profile can also be enabled by sending the enable-pan.wpk file (available on-line at https://www.bluegiga.com/as/current/enable-pan.wpk) to Access Server by using Bluetooth Object Push profile or by inserting a USB memory dongle with the file in its root directory to Access Server's USB port.
Note: The default username is root and the default password is buffy.
2.3.1. Management Console
If you do not have a Bluetooth LAN/PAN client and if Access Server is not connected to your LAN, or if you do not know the IP address given to Access Server, you can get the first shell prompt access by using the management console.
To setup the management console, proceed as follows:
Have a PC with a free COM port.
Power off Access Server.
Configure your terminal application, such as HyperTerminal in Windows, to use the settings below for your computer's free COM port
Connect the serial cable shipped with Access Server to your PC's free COM port.
Connect the serial cable to the management (user) port in Access Server (see Figure 2-1).
Power on Access Server.
Enter letter b in the terminal application during the first five seconds, while the blue LEDs in Access Server turn on one by one.
The management console is now activated and you can see the boot log in your terminal window.
Note: The boot process may stop at the following U-Boot prompt:
              Hit any key to stop autoboot:  0
              U-Boot>
If this happens, enter command boot to continue to boot Linux.
Wait for the device to boot up and end with the following prompt:
Please press Enter to activate this console.Press Enter to activate the console. You will be logged in as root in directory /root:
[root@wrap root]You can now control Access Server from the management console.
2.3.2. Accessing Remotely
When Access Server is connected to a LAN, it tries to get the IP address by using DHCP and Zeroconf by default. You can then use the wrapfinder application to find the IP address (see Section 2.2).
If you cannot get the IP address by using the wrapfinder, another way to see the IP address of Access Server is to connect with a management console (see previous section), power on the unit and, after the system is up and running, give the ifconfig nap command. The inet addr field for the nap interface contains the IP address of Access Server. For example, in the following capture from the management console, the IP address is 192.168.42.3.
        [root@wrap /]$ ifconfig nap
        nap      Link encap:Ethernet  HWaddr 00:07:80:00:BF:01
                 inet addr:192.168.42.3  Bcast:192.168.42.255  Mask:255.255.255.0
                 inet6 addr: fe80::207:80ff:fe00:bf01/64 Scope:Link
                 UP BROADCAST MULTICAST  MTU:1500  Metric:1
                 RX packets:12635 errors:0 dropped:0 overruns:0 frame:0
                 TX packets:8 errors:0 dropped:0 overruns:0 carrier:0
                 collisions:0 txqueuelen:100
                 RX bytes:1686246 (1.6 MiB)  TX bytes:1640 (1.6 KiB)
                 Interrupt:24 Base address:0xc000
|
You can use this address to connect to Access Server remotely over SSH, SCP or SFTP.
Note: The default username is root and the default password is buffy.
2.3.3. Transferring Files to/from Access Server
You can transfer files to and from Access Server by using, for example:
SCP (secure copy over SSH)
SFTP (secure FTP connection over SSH)
FTP (plain FTP connection)
Note: FTP is disabled by default for security reasons. Use SFTP instead.
Tip: If enabled, use the integrated FTP client on the Internet Explorer (type ftp://root:buffy@wrap-ip-address/ in the address bar)
Bluetooth OBEX (Object Push and File Transfer Profiles) to/from directory /tmp/obex in Access Server
NFS (mount an NFS share from a remote computer as a part of Access Server's file system)
SSHFS (mount an Access Server directory over SSH as a part of any other Linux host file system)
To download and install SSHFS, visit http://fuse.sourceforge.net/sshfs.html.
CIFS (mount a Common Internet File System share from a remote computer as a part of Access Server's file system). A CIFS client, available in a separate installation packet, is required.
USB memory dongle (see Section 3.4 for more information).
Xmodem/Ymodem/Zmodem (use rz/rx/rb/sz/sx/sb commands from the management console)
For examples of transferring files, see Section 6.3.4.
2.4. Introduction to Configuration
When Access Server is installed and powered up for the first time, the default configuration settings are being used. With these settings, Access Server automatically configures its network settings assuming that it is connected to a LAN network with a DHCP server running. Additionally, Access Server also uses Zero Configuration Networking (also known as Automatic Private IP Addressing) to connect to the 169.254.x.x network, which can be used if the network has no DHCP server.
After booting up, the only Bluetooth profiles enabled are the Object Push and File Transfer Profiles, used to send files to/from Access Server.
More Bluetooth profiles can be enabled, and most of Access Server settings can be configured by using the setup application. It has a WWW interface at http://wrap-ip/setup but it can also be run at the command line.
All configurable settings in the setup application are listed in Appendix B with short help texts.
Note: The default username is root and the default password is buffy.
2.5. Using the Setup WWW Interface
The easiest way to change Access Server settings is to use the WWW interface. Accessing the WWW interface is instructed in Section 2.2.
A typical WWW configuration page is shown in Figure 2-8 (This page can be found at Setup → Security settings)
The different parts of the WWW Setup page are discussed in the following list:
Status area
The status area serves two purposes:
It indicates that the changes are permanently saved when the user clicks the Save button (or when the user clicks a toggling Yes/No link).
If invalid values were entered in one or more fields, an error message is shown in this area (see Figure 2-9).
Note: It is typically necessary to reboot Access Server for the changes to take effect. This can be done through the WWW interface (Advanced settings menu).
Number or text entry fields
Most of the configurable settings are text (or number) entry fields. For some fields, such as the IP address or netmask, there are restrictions on the input format. Setup validates the input at save time and accepts valid data only. The fields with errors are shown to the user so that mistakes can be fixed (see Figure 2-9).
Help -link
Click the Help link to retrieve the setup page again with requested help information displayed. For an example, see Figure 2-10.
Warning If you have made changes to the settings on the page before clicking Help and not saved them yet, they are lost.
Yes and No radio buttons
These buttons are typically used to configure a setting that can be either enabled or disabled, and this setting has no effect on the visibility of other settings.
Reset button
Reset button resets the fields to the values currently in use at Access Server. In other words, the Reset button discards unsaved changes.
Note: The Reset button does not make a "factory reset".
Save button
Save button sends the WWW page to the setup application for validation. If the values in the fields are valid, they are permanently saved and the page is refreshed with the Changes have been saved. message at the top. The accepted values are shown in the page fields.
If there were errors in the fields, these are shown as in Figure 2-9.
Note: It is typically necessary to reboot Access Server for the changes to take effect. This can be done through the WWW interface (Advanced settings menu).
Back link
Press the Back link to return to the previous level of the Setup menu hierarchy.
Note: Pressing the Back link does not save changes in the fields on the current page.
Exit link
Exit link quits the setup application and returns to the Access Server's main WWW page.
Note: Pressing the Exit link does not save changes in the fields on the current page.
Link to a configuration file
Some of the configurable settings are actually editable configuration files, such as /etc/rc.d/rc.local for Setup → Advanced setting → System startup script. Clicking the link will retrieve the file for editing in the browser window, or create a new file, if it does not exist. See Figure 2-11.
Note: You can edit any file through the WWW Setup. to edit files, navigate to Setup → Advanced setting → Edit other configuration files.
Toggling Yes/No and on/off links
Clicking the Yes/No link (see Figure 2-12) immediately changes the setting and saves the change. Typically these links are used display or hide further settings.
The on/off links in Setup → Applications → Default startup applications behave in a same way, making and saving the change immediately (see Figure 2-13).
Note: To configure the default startup applications from the command line, use the chkconfig command.
Upload links
The WWW Setup has settings that allow user to upload files to Access Server, for example Setup → Advanced → Upload a software update (see Figure 2-14).
Use the Browse... button to select the file to be uploaded, and send it to Access Server by clicking Upload.
Browsing files
Some WWW Setup pages allow users to browse the Access Server file system or part of it, such as Setup → Advanced settings → Browse all files (see Figure 2-15).
Click the directory names to navigate in the file system.
Click a file name to view its contents.
Click del to delete a file or an empty directory.
Warning Deletion is not confirmed.
The WWW Setup also has menu items that run commands in Access Server, and show the output in the browser window. Some commands, such as rebooting Access Server, are confirmed before execution.
2.6. Using the setup Command Line Application
The basic configuration settings can also be changed by using the setup application at the command line interface.
The setup application displays the settings in a hierarchical menu (see Figure 2-16). Navigating the menu is accomplished by entering the number or letter corresponding to the setting to be viewed and/or changed and pressing Enter. Pressing only Enter either accepts the previous value of the setting or returns to the previous level in the menu hierarchy.
Note: Ensure that your terminal application does not send line ends with line feeds. If your terminal sends both CR and LF when you press Enter, you cannot navigate in the setup application.
2.7. Resetting a Configuration
You can reset the default configuration with the setup -r command. The command requires rebooting of Access Server. When the system starts up, the default configuration settings are restored. If you have only changed the configuration by using the setup application, the following commands at the Access Server's command prompt will suffice:
      [root@wrap /]$ setup -r
      [root@wrap /]$ reboot
|
Note: This does not reset the edited files to factory defaults; it only affects only the settings changed through the WWW Setup or the setup command line application.
2.8. Exporting and Importing Configurations
You can export configuration settings (expect for passwords and the list of default startup applications) with the following command:
[root@wrap /root]$ setup -o > settings.txt
|
The saved settings can later be restored with the following commands:
      [root@wrap /root]$ setup -m settings.txt
      [root@wrap /root]$ reboot
|